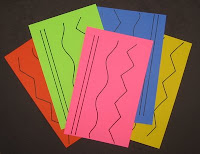
 These are incredibly simple to do and give students an opportunity to practice cutting. The best part is that every single student's work is a success, no matter what. There also isn't a huge amount of preparation, and practically no clean up.
 To prepare, I created a line template for students to cut. I wanted them to experience cutting a variety of lines, so on half a sheet of copy paper I drew a couple of straight lines, a meandering line, and a zig-zag line, then duplicate it on the other half of the paper. Then I copy this onto 9x12 construction paper in about ten or so colors and chop those in half.

I start the lesson by talking about lines. I ask students to tell me what they know about lines; I draw samples on the white board. Then I quickly demonstrate the activity. To start, each student chooses one template to cut. I like to make way more than the number of students, and put one of each color on each table. This way every student gets a choice of color, and every student at each table is working with a different color. Once they choose their color I just take away the extras. As they work, I help those students who are still learning to use scissors... and there are many of them. Some don't know where their fingers go. Some try to cut upside down. I show them how to hold the paper vertically, cut going "up" and to turn the paper instead of the scissors.

Students simply cut on the lines and then glue the resulting pieces onto black construction paper. Voila! Finished artwork! But not a finished lesson. We also look at two at a time and compare what different students do with their pieces. Some students like to glue them down in straight rows. Others will overlap them. Some create a border. Others just glue with no plan. Whatever they do, each one is a success, and they are awesome to look at when displayed on the wall.

No comments:
Post a Comment