Collage is one of my favorite art techniques to use with children. It's hard to mess up a collage, and the possibilities for subject matter are endless. These particular collages have a math twist and, depending on the directions and the grade level, can have some problem-solving embedded in them as well.
The collages pictured here were done by first grade students. The directions were to use:
- one circle
- two lines
- three different triangles
- four colors
Now that seems pretty simple, but the execution has some tricky parts. Many students are confused by the direction to use four colors, because they only use three shapes (circle, line, triangle) but end up with six parts. I try to ask them questions as they are working: "How many colors do you have here?" "How many colors do you need?" "Could you trade something?" I try really, really hard not to just tell a student to, for example, trade "this orange triangle for a green one" or some such thing, because I don't want to take away the opportunity for students to work through the problem on their own.
I demonstrate how to cut lines from the edge of a straight piece of paper, and how to cut triangles by cutting the corner off a piece of paper. With table groups, everyone gets one 9x12 sheet of black paper for the background, and I put a selection of 6x9 pieces of construction paper in the middle of the table, just one sheet of each color so they have to share the colored paper. This has the added benefit of preventing two or more students from using all the same colors for their designs.
I have done geometric shape collages with students in all grade levels. With Kindergartners, the directions are simpler, and there are less shapes involved. With fifth grade students, the directions are more complex, including more sophisticated geometric terms, and I might throw in a fraction element. I have them use, for example, three different types of triangles, four different quadrilaterals, five colors or less, and to attempt to cover approximately half the area of the paper with their shapes. Depending on the grade level, this activity can be a way for students to demonstrate their knowledge of some geometry vocabulary. Best of all, though, they are great fun to look at.
shape tracing
These Kindergarten shape tracing designs are made by tracing the same shape template several times, overlaying the shape in different directions to create a variety of interior shapes and spaces. Each table group has a variety of sizes of cardboard or plastic squares, rectangles, triangles, and circles to choose from. When giving directions, I emphasize that they should use only one shape to do all their tracings; I demonstrate this for them using a dark colored crayon for the tracing lines. I point out the variety of shapes and spaces created by the overlapping contour lines of the original shapes, and invite them to color in the spaces however they want to. I also demonstrate cutting the entire design around the outside and gluing it onto a background color that is present in the colored areas.
Interestingly, students will tackle this activity in different ways. Some want to trace the shapes next to each other rather than overlapping. Some like to make large spaces while others will make small ones. Some students take the time to select certain colors for the coloring part, or approach the coloring in a methodical way: starting with the smallest spaces, or starting with the ones nearest the center and radiating out, or starting with the outside spaces and working their way to the center. Some students jump all over the place, switching colors with each new space, while other students might use the same color for several spaces before choosing a new color.
Some students need a contour line to help them cut all around the outside of the shapes, while others grasp the concept right away. It helps to ask each student to trace with their finger where they are going to cut. There are always a couple of students, at least, who cut into the design, so it's important to keep a watchful eye and to be available with scotch tape.
When sharing these, I like to show two or three at a time and ask students to compare the colors, or count the triangles, or find other shapes that have been created by overlapping the original shape. This activity takes less than an hour, uses no special materials other than the shapes for tracing, and can be extended in a variety of ways. Students can be given limited colors to use, they can use chalk or watercolors in the spaces instead of coloring them, or they can be asked to make patterns or do rubbings inside the spaces.
geometric figures
I have done Geometric People with many second and third grade classes. I've also done a simpler version with Kindergarten and first graders, and more complex versions with upper grade GATE students. Recently I had the idea to give students the choice of creating a person or an animal entirely out of geometric shapes. The activity begins with a review of geometric shapes. With younger students, I draw them on the white board and explain that these are the only shapes they can use. We then look at pictures of animals and talk about the possible shapes that could be used for bodies, heads, ears, tails, and legs. A discussion about the possible shapes for the parts of a person is accompanied with directions that geometric people need to be showing some activity. Depending on the class, I will draw a geometric person and/or animal on the board while they suggest shapes, keeping all shapes separate from each other and pointing out to students that none of the shapes touch each other.
Students are able to choose one bright color for their figure. They don't use pencils to draw any shapes first because I want them to start training their eyes to visualize what they are going to cut. I've found it helpful to demonstrate for students different ways to cut large and small triangles without wasting a lot of paper, because over time I've found that most students want to cut straight into the center of the paper to cut shapes that result in some very "unstraight" edges. I show them how to use the straight edges of the paper for one or two straight sides of their shapes. I also show them how to cut a circle or oval by starting with a square or rectangle and rounding the corners.
One day, when a couple of students had finished their figures and everyone else still had a way to go, I decided to have them do rubbings of their geometric figures. This was so successful that I have made it a regular part of this lesson/activity. Students can do one rubbing or they can do repeated rubbings, moving their paper and using different colors, until they have filled the paper. Sometimes students can do more than one rubbing using totally different colors. During the discussion period, we can then talk about different combinations of colors and how they make us feel.
Overall, this is a really simple activity that takes virtually no planning, no preparation, and results in very little mess. It requires students to make choices of shapes based on their own observations. When a whole class set is displayed as a group, especially on a black background, the result is dramatic, whimsical, and colorful.
line pattern rubbings
First-graders get cutting and patterning practice in this activity, which also has a problem-solving twist. Whether or not students create a pattern, the results are interesting and can create quite a colorful display.
The first step is for students to cut some strips from a piece of black construction paper, about 3x6. They glue the strips onto a white 6x6 piece of construction paper to create a design. Some students like to create a "picture" while others stick to designs or patterns. When the glue has been given a short time to dry, students do rubbings of their design on a 6x18 strip of white drawing paper. When I demonstrate how to do the rubbings, I show them that rotating the collage design for each new rubbing will result in an interesting pattern. Students use their choice of one, two, or three colors. The problem solving piece comes when students need to do a second 6x18 rubbing that exactly matches the first one. For some students, this is not as easy as it would seem. When the rubbings are complete, all three pieces are taped together to make a banner.
During the discussion, we look at the patterns created by the series of rubbings. Students are asked to describe their own patterns, or to name the patterns created by other students. The discussion also includes reference to colors used, especially the results of using heavier or lighter pressure with the crayons.
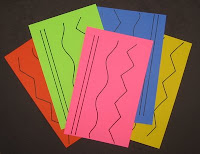
kindergarten line collages
These are incredibly simple to do and give students an opportunity to practice cutting. The best part is that every single student's work is a success, no matter what. There also isn't a huge amount of preparation, and practically no clean up.
To prepare, I created a line template for students to cut. I wanted them to experience cutting a variety of lines, so on half a sheet of copy paper I drew a couple of straight lines, a meandering line, and a zig-zag line, then duplicate it on the other half of the paper. Then I copy this onto 9x12 construction paper in about ten or so colors and chop those in half.
I start the lesson by talking about lines. I ask students to tell me what they know about lines; I draw samples on the white board. Then I quickly demonstrate the activity. To start, each student chooses one template to cut. I like to make way more than the number of students, and put one of each color on each table. This way every student gets a choice of color, and every student at each table is working with a different color. Once they choose their color I just take away the extras. As they work, I help those students who are still learning to use scissors... and there are many of them. Some don't know where their fingers go. Some try to cut upside down. I show them how to hold the paper vertically, cut going "up" and to turn the paper instead of the scissors.
Students simply cut on the lines and then glue the resulting pieces onto black construction paper. Voila! Finished artwork! But not a finished lesson. We also look at two at a time and compare what different students do with their pieces. Some students like to glue them down in straight rows. Others will overlap them. Some create a border. Others just glue with no plan. Whatever they do, each one is a success, and they are awesome to look at when displayed on the wall.
harold and the purple crayon
Planning hour-long art lessons for Kindergarten students can be tricky, because it's difficult to imagine what activities they will do quickly and what kinds of activities will take them a longer time to complete. So, I try to have an additional, simple activity to extend the time for those students who finish faster than I would have expected. I could have them just read books or draw pictures, but I like it better if they can do a second activity that matches the lesson.
Thus, the birth of the purple pictures. First, I read the book "Harold and the Purple Crayon" by Crockett Johnson, having students notice what Harold does with his purple crayon. I explained that they'd do a line collage first, and then if they had time, they could draw some of their own purple pictures. Some students really got into it, while others simply filled the paper with scribbles and lines. Later, I had some of the students tell about what they had drawn. I pointed out details in their drawings that added interest, such as stars in the sky, or facial expressions. This turned out to be a perfect addition to the line collages they did the same day.
not quite mondrians
I wanted my second grade students to play around with lines. Even though I had some ideas, I explored some art lesson websites and came across an activity that looked colorful and easy to do. I decided to try it after altering it a bit. The originals had all the spaces filled with vibrant colors, which was very dramatic, but I am working with a schedule in which I need to make sure that all students can finish in an hour, and I didn't think they could get the whole paper colored in during such a short time and I wanted them to be able to work carefully and mindfully. So I simplified. Simplifying is always good in the art world. Of course, that's my opinion, since I am a kind of minimalist.
For this activity, all students needed to do was use a ruler to divide the paper into sections (easier said than done), then fill each section with lines, using bold colors (also easier said than done), and finally cut black construction paper lines to glue over the pencil lines.
Before starting, I had the students tell me what they knew about lines, and I drew different kinds of lines on the white board to show different ways to fill the spaces. I thought these were going to be a real piece of cake, but some students had a bit of trouble only making five pencil lines to start with. If they hadn't gone too overboard, we just left it. If they had a dozen lines, they got a new piece of paper and some clearer directions. In the long run, it wouldn't have made any difference, but I knew that the line cutting at the end was going to take a bit of time and the thought of somebody needing to cut about sixteen lines when everyone else only needed five was a concern. So, they got a new paper and were asked to make less lines. This was only an issue because they only have one hour with me. If I were in a self-contained classroom, I would just let it be and give them extra time to finish up. Without the luxury of time, there are some adjustments that need to be made.
As they started filling the spaces with colorful lines, I encouraged them to use dark lines, bright colors, and to work on and finish one space before going on to another. It was interesting to see so many students using the crayons with such a light touch. Occasionally, I held up a student's work to show an example of bright, bold colors with lines clearly drawn. When there were twenty minutes left in their hour, I had them finish up wherever they were and cut and glue their lines.
Some students had a very hard time getting out of the "straight line" box, but a few managed some diagonals, and these were especially interesting. If I do these again, I will make sure that students know they will only have time to fill in a few spaces and encourage them to fill spaces that are not adjacent. During discussion, students found line treatments that they liked in other students' work, and were encouraged to use appropriate art vocabulary to identify and discuss the works of others. Overall, these were quick and very successful!
bubble people
I have a pet peeve: stick people. So I thought... well... might as well start at the beginning. I came across a people drawing lesson in "Talking, Drawing,Writing" by Martha Horn and Mary Ellen Giacobbe, a book about art and writing that starts with using ovals for every body part. My first idea was to do this lesson with all the students and then have the Kindergartners draw clothes on them, the first graders fill the ovals with patterns, and the second graders do elaborate warm/cool compositions by filling the people ovals with warm or cool parallel lines and then doing a background in the opposite color. Heh. I was a little overambitious on the second grade idea. We were lucky to get the person filled with lines, although a few students did manage to go on to a second bubble person, as they came to be known.
This lesson, for all three grade levels, started with a "loosening up" exercise with a large sheet of white paper on which they practiced drawing dots, circles, ovals of different sizes and shapes, and assorted lines. Then Kindergartners had a read aloud - "From Head to Toe" by Eric Carle (which included much wiggling, clapping, stomping, and kicking) - and everyone learned how to use ovals of different sizes, shapes, and lengths for all the main body parts. Kindergartners were asked to color their bubble people any way they wanted, and as they finished, to draw more on their practice paper. First graders filled theirs with dots and lines, using two primary colors, and those who had time were able to mount them on the third primary color. One creative first grader decided to mount his standing on one hand, and was careful to remind me that it goes "this way." :-) Second graders drew a contour line around their bubble person to define the shape. They then filled the complete shape with warm or cool colored parallel lines. If they finished one, they were asked to draw another on the same paper and to fill it with lines using the same colors.
Everyone did a great job! During sharing we looked at how different they all were, and students were able to talk about what was hard to do, what they liked about their bubble people.
Now... if it will just stick, there will be less stick people in the world! :-)
.
stars and stripes collages
To launch my new school year and celebrate Constitution Day, i had all my students do red, white, and blue (and yellow!) collages. Kindergarten and first graders did torn paper, second graders got to use scissors. I read the book, "I Pledge Allegiance" by Bill Martin, Jr. to launch the lesson, pointing out the students the torn paper illustrations. I also showed them Jasper Johns' "Three Flags" and Alexander Calder's "Stars and Stripes" so they could see how two famous artists used the flag images and colors in their art work.
Over four hundred fifty students, and every single collage was successful! What a great start to my year!
I have two versions of this lesson available in my TeachersPayTeachers store:
Patriotic Colors Torn Paper Abstract Collage is for lower elementary grades.
Patriotic Colors Cut Paper Abstract Collage is for upper elementary grades.
Enjoy!
into the classroom
Lucky me! I got a teaching job making art with little kids! I've been in the classroom for twenty years, first as a full time classroom teacher, then working part time with at-risk students, ELL students, GATE students, and Kindergarten students. And now I get to teach art to Kindergarten, first, and second grade students at three different schools, What a great way to spend three days a week!