• supporting creativity in the classroom and beyond •

• supporting creativity in the classroom and beyond •
Showing posts with label faces. Show all posts

looking at art with kids

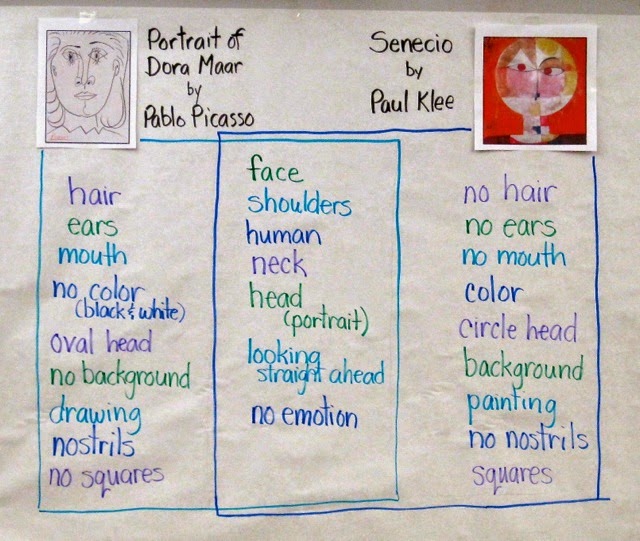
With the idea that I would have students do some "mystery paintings" of faces.... white crayon on white paper with watercolor resist overlay.... I started out by having them compare two works, one by Pablo Picasso and one by Paul Klee. I chose these two works because I intended to have them do a contour drawing of a face and then use color blocks of watercolor over the drawings, and these two works are perfect examples.

We started with my standard question: "What do you notice?" I charted the students' responses, encouraging them to identify whether their "noticing" was of the Picasso, the Klee, or whether it applied to both of the works. I asked students to use the artists' names rather than saying "the one on the left" or pointing and saying "that one" or "the round one" or "the pencil one." Those attributes that applied to both were charted down the center. Since these particular second graders are familiar with Venn Diagrams, they understood right away how to read this finished chart after I added the "boxes" around the lists.

On to the students' art making...

I started with a short demonstration of the "mystery painting" technique, drawing a large face with lots of lines for hair and showing students how I could almost see the drawing if I held the paper up to the light. I added a line pattern in the background for interest, and then modeled painting in blocks of color. I emphasized that I was not following the lines, but letting the drawing come through on its own as I painted.

Then I switched gears and decided to invite them to draw anything they wanted with white crayon on white paper. Together we brainstormed subject matter:  animals, flowers, landscapes, and... of course.... faces.

As they drew, I reminded students to press hard with the crayon and try to use the whole paper, either adding more to their subject matter or perhaps including a pattern in the background for interest. As they were ready, they painted over their drawings. 


These were just plain fun to do. Watercolor resist is a popular art-making activity and really does not need a lot of prep or explanation, but the introduction with these two art works gives an added art-appreciation and art analysis dimension to the lesson.

Looking at these two art works helps the students see how a face can take up a whole page, and to realize that one doesn't need to "follow lines" when painting. It also gives students the opportunity to see and talk about representational abstract art, and to become comfortable with the idea that a face drawing does not need to be absolutely realistic to be successful.

This art-making session ended with students writing about their art work. I gave them the choice of simply telling about their own process, describing how to create a "mystery painting," writing about the difference between Picasso's and Klee's faces, or comparing their own art work to either Picasso's or Klee's. Most students chose to just write about their own process, but two students did write comparisons... one compared his art work to Paul Klee's, and one compared the Picasso and Klee faces.

All in all, a successful lesson, during which a good time was had by all!


kindergarten face collages

Kindergartners can never have enough cutting practice. This activity gives them lots of that, and more, plus it is a great way to use up some construction paper scraps. For these face collages, I purposely took all the pink construction paper out of my scrap bin, because I wanted students to use wild colors that have nothing to do with real faces. I'm sure the one little girl who asked for pink thought I was just being ornery when I told her we weren't using any pink this time. All we needed was an assortment of colors of 9x12 construction paper for the background, 6x9 pieces for the faces, and a lot of construction paper scraps. I did provide tagboard ovals for students to trace for the head shape, but other than that they were on their own.

I gave students simple directions, emphasizing that they needed to choose two different colors for the face and background. I spread the construction paper scraps across the floor and invited them to take any colors they needed.

As students finished tracing their head shapes, I took pencils away so that they would have to "free cut" the shapes for their faces without drawing them first. Most students got right into it and started immediately cutting shapes. For those who insisted that they didn't know how to cut something, I had them look at my face while I traced the contour of the part they were trying to make and then asked them what shape they might use and to give it a try. If they were still hesitant, I would model cutting a shape for them, and then have them cut their own. For the most part, students were happy to have unorthodox shapes for their facial features.

As students finished their faces, we lined them up on the white board tray and I had them look at their own work and then look to see if they could see anyone else's that had something the same as theirs. Then we compared two at a time, looking for similarities. Most students found same colors or shapes, but an occasional student notice that "they both have wiggly hair" or another quality that was more sophisticated than color or shape.